-
Starting to finish
Jul 24, 2010
-
4 min read
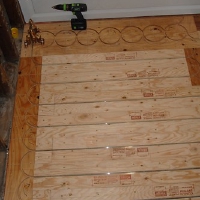
 With all of the drywall pieces in place on Monday, we were able to spend the rest of this week focusing on the floor (and a little on the shower, too). Tuesday marked the installation of the cement board for the floor. While it is normally a very straightforward process, we had one teensy little obstacle: the radiant tubing. The cement board is secured with screws, and we obviously don’t want those going through the radiant heat tubing, so we had to devise some way to make sure to avoid it.
 -
Just four walls
Jul 20, 2010
-
4 min read
 This past weekend, my brother graciously offered to help us install drywall for the bathroom. Since that meant that we’d no longer have access to any of the plumbing in the walls, it meant that it was time to test the radiant tubing to make sure everything was in tact and not leaking. I spent the better part of Friday trying to get the tubing to hold pressurized air, but it would not.
 -
Simply radiant
Jul 16, 2010
-
3 min read
 We finished installing the cement board for the tub surround yesterday evening. This included the piece that covers the plumbing wall of the shower, which was by far the most difficult to cut, having a total of four cutouts, each with very minimal tolerances. I actually surprised myself by getting it right on the first shot, especially since we made all the cuts based off of measurements, rather than direct reference marks (i.
 -
Come on in, the water's fine!
Jul 13, 2010
-
3 min read
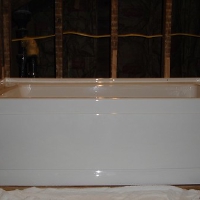
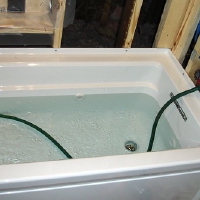 This afternoon, half of my order of tubing supports came in, which meant that I was able to work again on the plumbing. It didn’t take me too long to get the tub/shower lines routed and connect in the basement, which meant… testing! Since there was finally water to the shower fixtures, I could test both that plumbing work, and the tub and drain. So with a bit of trepidation, I started with filling up the tub…
 -
Plumbin' and routin' and strippin'
Jul 9, 2010
-
5 min read
 Earlier in the week, I started framing in the niches for the shower. With the walls completely opened up, it’s trivial to add a bit of framing and get some nice custom-sized niches for storing all the various doo-dads that tend to accumulate in the shower. After spending a fair amount of time cutting, aligning, and leveling all of the lumber, I stood back to admire my work, and realized that I’d completely forgot to account for the thickness of the backer board and tile, so my finished niches would have been about 1 inch shorter than a shampoo bottle.
 -
Simply radiant
Jul 6, 2010
-
2 min read
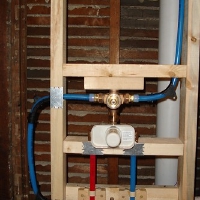
 Since this week brought some abnormally pleasant weather, we didn’t manage to put as much work into the bathroom as I would have liked. But we did still manage to work through quite a bit. Early in the week, I got the tub drain plumbed into the drain stack. I also fished most of the hot and cold supply piping up from the basement and through the walls. Luckily, I found a spot that gave a good straight shot for three of the five lines I need to run, so it was pretty simple overall.
 -
A room with a bath
Jun 28, 2010
-
4 min read
 With all of the insulation in place, Friday marked the start of the drywall installation. We rented a drywall jack for $25 and set to putting the ceiling in place. Since the we lowered the ceiling height in the shower area by 6 inches (to 8 feet even), we decided to start there, since it’s just one piece. Getting it cut to size was easy enough, and with the clever trick of rubbing chalk on the bottom of the light fixture, we raised the sheet into place and got a nice outline of where to cut for the fixture.
 -
Onward and upward
Jun 25, 2010
-
3 min read
Alright, so I’m a bit behind on the updates. Unfortunately, between having to head back to work during the days, and having to take a slight detour, things have been moving a bit slow. We had to spend the better part of two weeks working on re-wiring all of the lighting on the second floor, since it was all knob-and-tube, and the lines passed through the bathroom wall and ceiling. Since it’s not a good idea to put insulation anywhere near knob-and-tube (not that it stopped a previous owner), we decided to go ahead and re-wire while we had the easy attic access.
Software engineer turned MD.
Devout turophile.
Father of Kent (pronouns: dog/bork).